Archon是什么?
官方介绍:
Archon 是 AI 编码助手的指挥中心 。对您来说,这是一个时尚的界面,用于管理项目的知识、上下文和任务。对于 AI 编码助手来说,它是一个模型上下文协议 (MCP) 服务器 ,用于协作和利用相同的知识、上下文和任务。连接 Claude Code、Kiro、Cursor、Windsurf 等,让您的 AI 代理访问:
- 您的文档 (抓取的网站、上传的 PDF/文档)
- 具有高级 RAG 策略的智能搜索功能
- 任务管理与您的知识库集成
- 添加新内容并与编码助手协作完成任务时实时更新
- 更多内容即将推出,将 Archon 构建为所有上下文工程的集成环境
说白了就一个上下文、知识库和任务管理的系统,通过mcp的方式与agent协作
Archon的部署
本文介绍Archon在windows上的部署,有点麻烦。linux或者mac跟着官方文档即可。
1. git clone
git clone https://github.com/coleam00/Archon.git2. 设置.env
前提:在这一步,你需要有supabase的服务,可以选择supabase官网提供的服务,也可以本地部署。
从左侧导览中可以跳转到supabase的本地部署。
进入Archon文件夹,将.env.example复制到.env
在.env中,有SUPABASE_URL和SUPABASE_SERVICE_KEY需要修改:
SUPABASE_URL
如果你在本机部署的supabase,填入http://host.docker.internal:8000即可
如果使用官网,填入项目首页的api地址,你需要先在官网创建项目

其中的Project URL就是
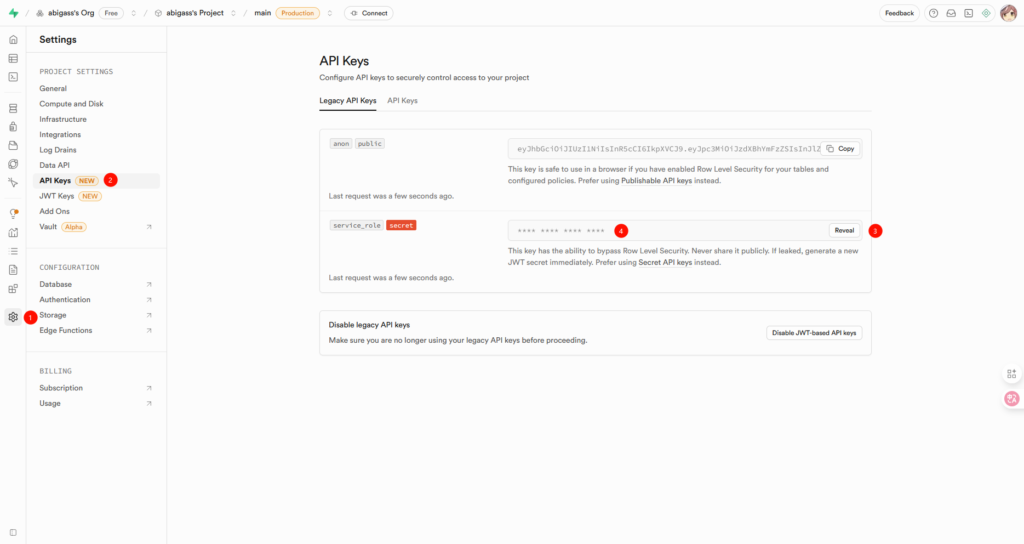
SUPABASE_SERVICE_KEY
如果你在本机部署的supabase,填入supabase/docker/.env中的SERVICE_ROLE_KEY
如果使用官网,填入设置中的service_role
3. 安装make
使用以下三种方式之一安装make:
# Option 1: Using Chocolatey
choco install make

# Option 2: Using Scoop
scoop install make

# Option 3: Using WSL2
wsl --install
# Then in WSL: sudo apt-get install make
或者问ai如何安装
4. 修改文件
启动之前有一堆设置要修,一些是将linux改成powershell命令,一些是将软件包换源
1. 修改archon/Makefile
修改第二行和第三行为:
SHELL := powershell.exe
.SHELLFLAGS := -NoProfile -Command
修改第六行为:
COMPOSE ?= $(shell powershell -NoProfile -Command "if (Get-Command 'docker' -ErrorAction SilentlyContinue) { \
    if (& docker compose version 2>$null) { \
        'docker compose' \
    } else { \
        'docker-compose' \
    } \
} else { \
    'docker-compose' \
}")
修改27-31行为:
install:
	@echo "Installing dependencies..."
	@cd archon-ui-main;npm install
	@cd python;uv sync
	@echo "✓ Dependencies installed"
修改34-41行为:
check:
	@echo "Checking environment..."
	@powershell -NoProfile -Command "if (-not (Get-Command node -ErrorAction SilentlyContinue)) { Write-Error 'Node.js not found (require Node 18+).'; exit 1 }"
	@node check-env.js
	@echo "Checking Docker..."
	@powershell -NoProfile -Command "if (-not (Get-Command docker -ErrorAction SilentlyContinue)) { Write-Error 'Docker not found'; exit 1 }"
	@powershell -NoProfile -Command "if (-not (Get-Command docker-compose -ErrorAction SilentlyContinue) -and -not (Get-Command docker -ArgumentList compose -ErrorAction SilentlyContinue)) { Write-Error 'Docker Compose not found'; exit 1 }"
	@echo "✓ Environment OK"
修改45-55行为:
dev: check
	@echo "Starting hybrid development..."
	@echo "Backend: Docker | Frontend: Local with hot reload"
	@$(COMPOSE) --profile backend up -d --build
	@powershell -NoProfile -ExecutionPolicy Bypass -File dev-backend-msg.ps1
	@echo "Starting frontend..."
	@powershell -NoProfile -ExecutionPolicy Bypass -File dev-frontend.ps1
2. 在archon文件夹下新建文件
新建dev-backend-msg.ps1文件:
# dev-backend-msg.ps1
if (Test-Path .env) {
    Get-Content .env | ForEach-Object {
        if ($_ -match '^\s*([^#\s]+)\s*=\s*(.*)\s*$') {
            $name  = $matches[1]
            $value = $matches[2] -replace '^[\x27\x22]?(.*?)[\x27\x22]?$', '$1'
            Set-Item "Env:$name" $value
        }
    }
}

$hostUrl = if ($Env:HOST) { $Env:HOST } else { 'localhost' }
$portUrl = if ($Env:ARCHON_SERVER_PORT) { $Env:ARCHON_SERVER_PORT } else { '8181' }

Write-Output "Backend running at http://${hostUrl}:${portUrl}"新建dev-frontend.ps1文件:
# dev-frontend.ps1
Set-Location "$PSScriptRoot\archon-ui-main"

if (Test-Path "$PSScriptRoot\.env") {
    Get-Content "$PSScriptRoot\.env" | ForEach-Object {
        if ($_ -match '^\s*([^#\s]+)\s*=\s*(.*)\s*$') {
            $name  = $matches[1]
            $value = $matches[2] -replace '^[\x27\x22]?(.*?)[\x27\x22]?$', '$1'
            Set-Item "Env:$name" $value
        }
    }
}

$Env:VITE_ARCHON_SERVER_PORT = if ($Env:ARCHON_SERVER_PORT) { $Env:ARCHON_SERVER_PORT } else { '8181' }
$Env:VITE_ARCHON_SERVER_HOST = if ($Env:HOST) { $Env:HOST } else { '' }

npm run dev
3. 修改archon\python\Dockerfile.agents
修改第8行:
RUN pip install --no-cache-dir --timeout 99999 -i https://pypi.tuna.tsinghua.edu.cn/simple -r requirements.agents.txt4. 修改archon\python\Dockerfile.mcp
修改第8行:
RUN pip install --no-cache-dir -r requirements.mcp.txt --timeout 99999 -i https://pypi.tuna.tsinghua.edu.cn/simple5. 修改archon\python\Dockerfile.server
在第四行和第六行,FROM和WORKDIR之间,添加:
# 使用清华镜像,避免官方源 502
RUN rm -f /etc/apt/sources.list.d/debian.sources && \
    echo '\
deb https://mirrors.tuna.tsinghua.edu.cn/debian trixie main contrib non-free non-free-firmware\n\
deb https://mirrors.tuna.tsinghua.edu.cn/debian-security trixie-security main contrib non-free non-free-firmware\n\
' > /etc/apt/sources.list将原先的第十五行,即RUN pip install --user --no-cache-dir -r requirements.server.txt这一行修改为:
RUN pip install --user --no-cache-dir --timeout 99999 -i https://pypi.tuna.tsinghua.edu.cn/simple -r requirements.server.txt 在原先的第18-20行,即第二个FROM和WORKDIR之间,添加:
# 使用清华镜像,避免官方源 502
RUN rm -f /etc/apt/sources.list.d/debian.sources && \
    echo '\
deb https://mirrors.tuna.tsinghua.edu.cn/debian trixie main contrib non-free non-free-firmware\n\
deb https://mirrors.tuna.tsinghua.edu.cn/debian-security trixie-security main contrib non-free non-free-firmware\n\
' > /etc/apt/sources.list
5. 初始化数据库
不管是自己部署的supabase还是官方的supabase服务,步骤一致
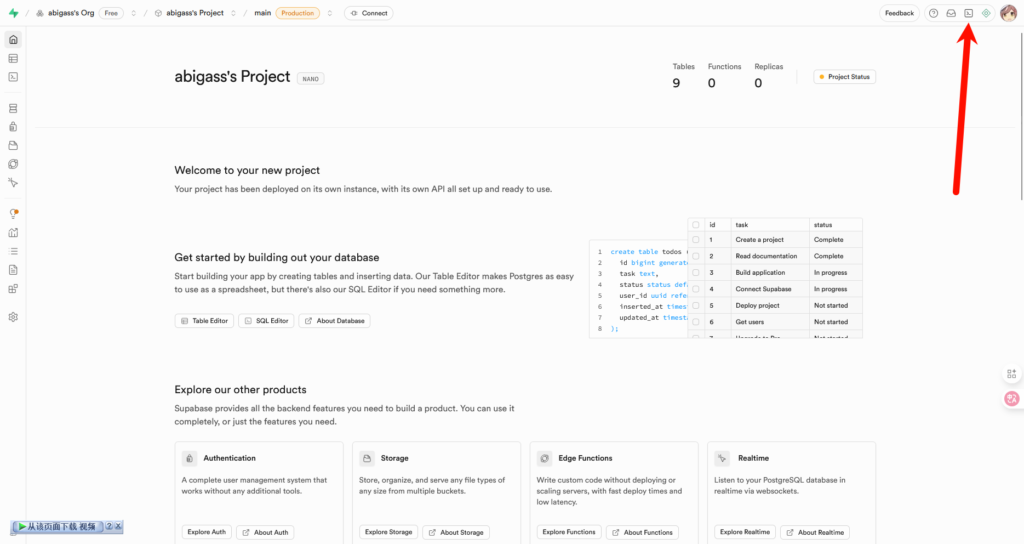
先点击右上角的SQL Editor:
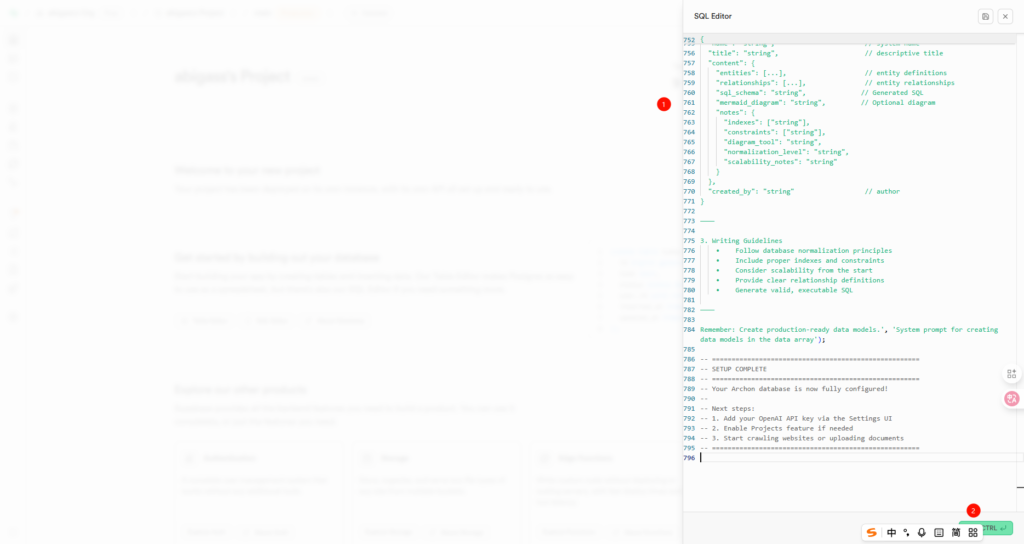
复制archon\migration\complete_setup.sql里面的内容,粘贴到编辑器里并点击执行:
6. 启动
打开docker desktop
在archon文件夹下打开启动终端,打开powershell,执行:
make installmake dev如果一切正常,你可以查看到终端里面的提示,打开地址为127.0.0.1:3737的archon的web页面。之后根据页面引导进行即可。
使用过程中不要关闭终端。
如果需要更改文件
比如更改了.env,需要重新创建docker image才能生效,方法为:
在archon文件夹下打开启动终端,打开powershell,执行:
make dev会自动recreate镜像
Supabase的部署
1. git clone
git clone –depth 1 https://github.com/supabase/supabase.git
2. 设置.env
进入supabase/docker
将.env.example复制到.env
有以下内容需要设置:
POSTGRES_PASSWORD=your-super-secret-and-long-postgres-password
JWT_SECRET=your-super-secret-jwt-token-with-at-least-32-characters-long
ANON_KEY=eyJhbGciOiJIUzI1NiIsInR5cCI6IkpXVCJ9.eyAgCiAgICAicm9sZSI6ICJhbm9uIiwKICAgICJpc3MiOiAic3VwYWJhc2UtZGVtbyIsCiAgICAiaWF0IjogMTY0MTc2OTIwMCwKICAgICJleHAiOiAxNzk5NTM1NjAwCn0.dc_X5iR_VP_qT0zsiyj_I_OZ2T9FtRU2BBNWN8Bu4GE
SERVICE_ROLE_KEY=eyJhbGciOiJIUzI1NiIsInR5cCI6IkpXVCJ9.eyAgCiAgICAicm9sZSI6ICJzZXJ2aWNlX3JvbGUiLAogICAgImlzcyI6ICJzdXBhYmFzZS1kZW1vIiwKICAgICJpYXQiOiAxNjQxNzY5MjAwLAogICAgImV4cCI6IDE3OTk1MzU2MDAKfQ.DaYlNEoUrrEn2Ig7tqibS-PHK5vgusbcbo7X36XVt4Q
DASHBOARD_USERNAME=supabase
DASHBOARD_PASSWORD=this_password_is_insecure_and_should_be_updated
SECRET_KEY_BASE=UpNVntn3cDxHJpq99YMc1T1AQgQpc8kfYTuRgBiYa15BLrx8etQoXz3gZv1/u2oq
VAULT_ENC_KEY=your-encryption-key-32-chars-min
POSTGRES_PASSWORD:
生成一个密码填入即可
该项是作为postgres的密码
JWT_SECRET:
生成一个至少32字符的随机字符串填入
该项是作为jwt的密钥
ANON_KEY和SERVICE_ROLE_KEY:
生成jwt格式的令牌填入即可,记得用JWT_SECRET
该项是作为supabases的anon和service令牌
提供一个生成jwt的脚本
import jwt, os, sys

secret = 'XXPAm8j6YallA5ZICLzIJAhWkjXCTKl4jylhZmjiQrnpkVEu2RhwwgWS482ir6P7'

anon_payload = {"role": "anon", "iss": "supabase", "iat": 1641769200, "exp": 1799535600}
service_payload = {"role": "service_role", "iss": "supabase", "iat": 1641769200, "exp": 1799535600}

anon = jwt.encode(anon_payload, secret, algorithm="HS256")
service = jwt.encode(service_payload, secret, algorithm="HS256")

print(f"ANON_KEY={anon}")
print(f"SERVICE_ROLE_KEY={service}")
其中,secret填入你自己的JWT_SECRET,anon_payload和service_payload 的内容可以自行修改
DASHBOARD_USERNAME:
不用更改
该项作为supabase的本地web服务的登录账号
DASHBOARD_PASSWORD:
生成密码填入即可
该项作为supabase的本地web服务的登录账号的密码
SECRET_KEY_BASE:
不用更改
该项作为supabase服务的密钥,不清楚有什么用
VAULT_ENC_KEY:
生成最少32字符的随机字符串填入
该项不清楚是什么
其余内容不必更改,看自己情况
如果你本机已有postgres服务,可以将.env里面的POSTGRES_PORT=5432这一行改成POSTGRES_PORT=5433
3. 启动
先打开docker desktop
在supabase\docker中执行:
docker compose pull
docker compose up -d
一切正常的情况下,你可以在http://localhost:8000中看到supabase服务了,输入DASHBOARD_USERNAME和DASHBOARD_PASSWORD即可登录
如果需要更改文件
比如更改了.env,需要重新创建docker image才能生效,方法为:
在archon文件夹下打开启动终端,打开powershell,执行:
docker compose down
docker compose up -d
archon使用评价
archon在我看来只是一个普通的知识库+上下文管理+任务系统,并没有其他突出的地方。使用起来会有任务系统的通病,就是容易偏执,一股脑做事难以回归约束。不过,我给出这样的评价是因为我个人不爱使用发挥ai自主性的任何工具,如果你经常用相关的工具来让ai一步到位的开发,那么archon的表现相当不错。
官方给claude code写的提示词和通用提示词不在一个层面上,看来也是以claude code为主。其通用提示词质量我觉得一般。
他的多ai协作我没有尝试,但是不过是多个ai通过mcp用同一套任务系统罢了。我没有这样的使用场景。
支持的模型供应商有点少。
如有任何问题,可以评论指出